Sunday, June 29, 2014

Need new Speakers?

Alright, so today I will be showing you how to install new speakers into your car. This is a fairly universal process, meaning its basically the same on every vehicle.

Tools I used:
Phillips Screw driver
Wire Strippers
Wire cutters
Wire connectors

Step 1
Remove the door panel and/or speaker cover. I'm using my fathers 2001 Subaru Forester again so the speaker cover just pops right off. Some people will have to remove the entire door panel (I do in my '01 Outback) to change the speakers. In which case additional tools will be needed.

Step 2
Remove speaker by unscrewing the three (in my case) black screws holding the speaker to the frame. MAKE SURE you don't unscrew the speaker housing instead of the speaker, its a waste of time.

Step 3
Remove wiring. Now, on my 92 Honda Civic, the speaker wiring was removable. On this car, the wiring is soldered to the speaker terminals. Cut them with your wire cutters. Make sure you remember which one went on the positive or negative side. They should be labeled.

Step 4
Connect terminals. This is easy, most speaker wire is 18 Gauge, so buy the appropriate size. Strip the wire about 1/2 an inch back and then insert the exposed wire into the new terminal. Then crimp the metal part with the crimping section of your strippers (its usually labeled on the tool).


Step 5
Connect wiring.

Step 6
Test/Install Speaker. Holding the edge of the speaker, turn your radio on and make sure sounds plays through the new speaker. If it doesn't, check your work. If it does, install the new speaker in place of the old one. Some speakers will require an adapter to fit some vehicles. My Outback did, my fathers Forester does not nor did my Honda.

Step 7
Reinstall door panel/speaker cover.

All done! Enjoy much better sound over your stock speakers!

Wednesday, June 25, 2014

Installing a new radio in a 2001 Forester

Well my dad wanted a radio in his 2001 Subaru Forester that he could hook his iPhone up to and listen to NPR podcasts (he's a historian so go figure. haha).

Heres what we got him (cost about $130). I didn't have time to do the speakers so they will come later. Make sure you get a radio harness that will fit your car. Any parts store can get that for you. Or if you buy it online they typically include them or at least remind you (thank you Crutchfield).

Tools I needed (your car may be different):
Phillips Head Screwdriver
Flat Head Screwdriver
Wire Strippers
Vinyl Electrical Tape


Set up:

You need to wire the vehicle harness adapter into the radio's adapter. This is super easy! Just match the colored wires together. But pay attention to which colors have a colored line on them.

You may have to strip the wires (about 1/2 inch should do it) on either of the harnesses, I did for the radio side. Most radio wiring fits the 18 or 16 gauge holes.


Then twist them all together.

Then, wrap each section of exposed wire SEPARATELY. You don't want wires touching, that can short out equipment or even start a fire. Thought I took a picture of them wrapped, but I guess not.

Removal/Installation:

First, remove any plastic dash pieces around the radio. All I had to do was pop them out with the flat head screwdriver.


Then remove the screws that are holding in the radio frame. For me that was only the 4 phillips screws you see around the radio and the bin pocket below it.

 Then remove radio with frame and disconnect any wires in the back and the antenna.


Here you see the antenna (left) and vehicle harness (right).

Connect the adapter to the harness. BEFORE GOING ANY FURTHER plug the new radio in to ensure that everything works.

Now, remove the old radio, again for me it was two phillips screws on each side of the frame. Install new radio in its place.

Installation is reverse of removal.
VOILA! NEW RADIO!

Sunday, June 22, 2014

Squealing belt?

Does your car make a squealing noise when its turning on, under acceleration, or turning? You probably have a loose belt. Whats the solution? Tighten it!

Disclaimer*
Not all cars have the ability to tighten the belt and you have to fully replace the tightener.

I will be using my fathers 2001 Forester which has a loose A/C belt to demonstrate tightening the belt.

Step 1
- Loosen the lock bolt (green). DO NOT REMOVE.

Step 2
- Tighten adjustment bolt (red) until the belt has about .5 inches of movement.

Step 3
- Tighten Lock bolt.

DONE!

Flat tire?

A surprising amount of people don't know how to change their tire in the case of having a flat. I think this is something that should be taught in Drivers Education but sadly is over looked. So I will try my best to show you how!

Here we shall be using my fathers 2001 Subaru Forester to demonstrate.

No, its not ACTUALLY flat, but who cares? Same principles.
First check to see if you have all of the proper equipment in your trunk:
- Spare tire (regularly check its air pressure)
- Lug Wrench

- Scissor Jack with pivot arm.

Step 1
- Loosen Lug nuts wit lug wrench (counterclockwise). DO NOT REMOVE THEM ONLY LOOSEN
Step 2
- Position scissor jack. For most cars, there is a stiffened support in the unibody that allows a lifting point. Please consult your owners manual for the proper jacking points.

Insert pivot arm into the hole on the scissor jack. Grasp the main rod with your secondary hand (left for me)


Grasp offset part with main hand.
Then using your secondary hand as the bearing and main hand as the motor. Rotate the arm so that it lifts the jack towards the car, eventually lifting the vehicle.
Remove the lug nuts fully and remove wheel.
Install spare tire, then reverse removal for installation. MAKE SURE YOU TIGHTEN THE LUG NUTS VERY TIGHT!

Thursday, June 19, 2014

Knowledge is Key!

So I've noticed that a lot of my fellow college students, and people in general, have no idea how a car works, let alone how to repair it. Therefore I will also be posting information in an attempt to better educate folks on the basic function of a car. For instance, what components of the vehicles intended functions are and how to locate these components when a repair is needed. Once you understand how a car works it will be much easier when you have to diagnose and repair a problem.

Sunday, June 15, 2014

Time for an oil change!?

For most of you college kids the most difficult part will be finding a place to do this. I luckily have a garage to work in and all of the proper tools. Since you're probably living in a dorm or at least away from home you most likely don't. An easy solution would be to go to the edge of a parking lot and park with one of your front tires on the curb and the other three on the parking lot. This should give you enough room to get under the front of the car.

I'll be using my 2001 Subaru Outback to demonstrate. This will provide a basic guide to what it looks like, but every car looks different.

What you'll need:
Oil (consult owners manual or parts store for capacity and viscosity)
Oil Filter (consult parts store)
Wrench (depends on car for what size, mine was a 17mm)
Oil Filter Wrench/Pliers (can sometimes use hand if you're strong enough)
Crush Washer (if applicable, ask parts store)
Drain pan
Funnel
Paper towels (for clean up)
Hand cleaner

Total cost, besides tools, approximately $25.

You may need additional tools to remove the splash guard under the car. Mine has been "removed" by mother earth while enjoying some off road driving. Haha

Parts stores are always advertising oil change specials. This week O'reillys offered two sales that greatly benefit budget minded students.

An oil change kit for $5 which gives you everything you need to service your car besides the tools, oil, and filter:


Oil and oil filter combos are often sold at parts stores on sale:


I only used that for demonstration purposes, I have oil and filters stockpiled at the house.


Step 1
Elevate the front of the car.

Step 2
Remove oil filler cap to prevent a vacuum when draining the oil.


Step 3
Locate filter and drain plug.


Step 4
Loosen drain plug counter-clockwise. But do not remove until pan is in place. Its easier to loosen without the pan in your way.


Step 5
Position drain pan. I set mine on a bucket to elevate it and prevent splashing.


Step 6
Remove drain plug. I used a paper towel to shield some of the heat from the plug. If you drove a while to where you are it will be hot so be prepared.....
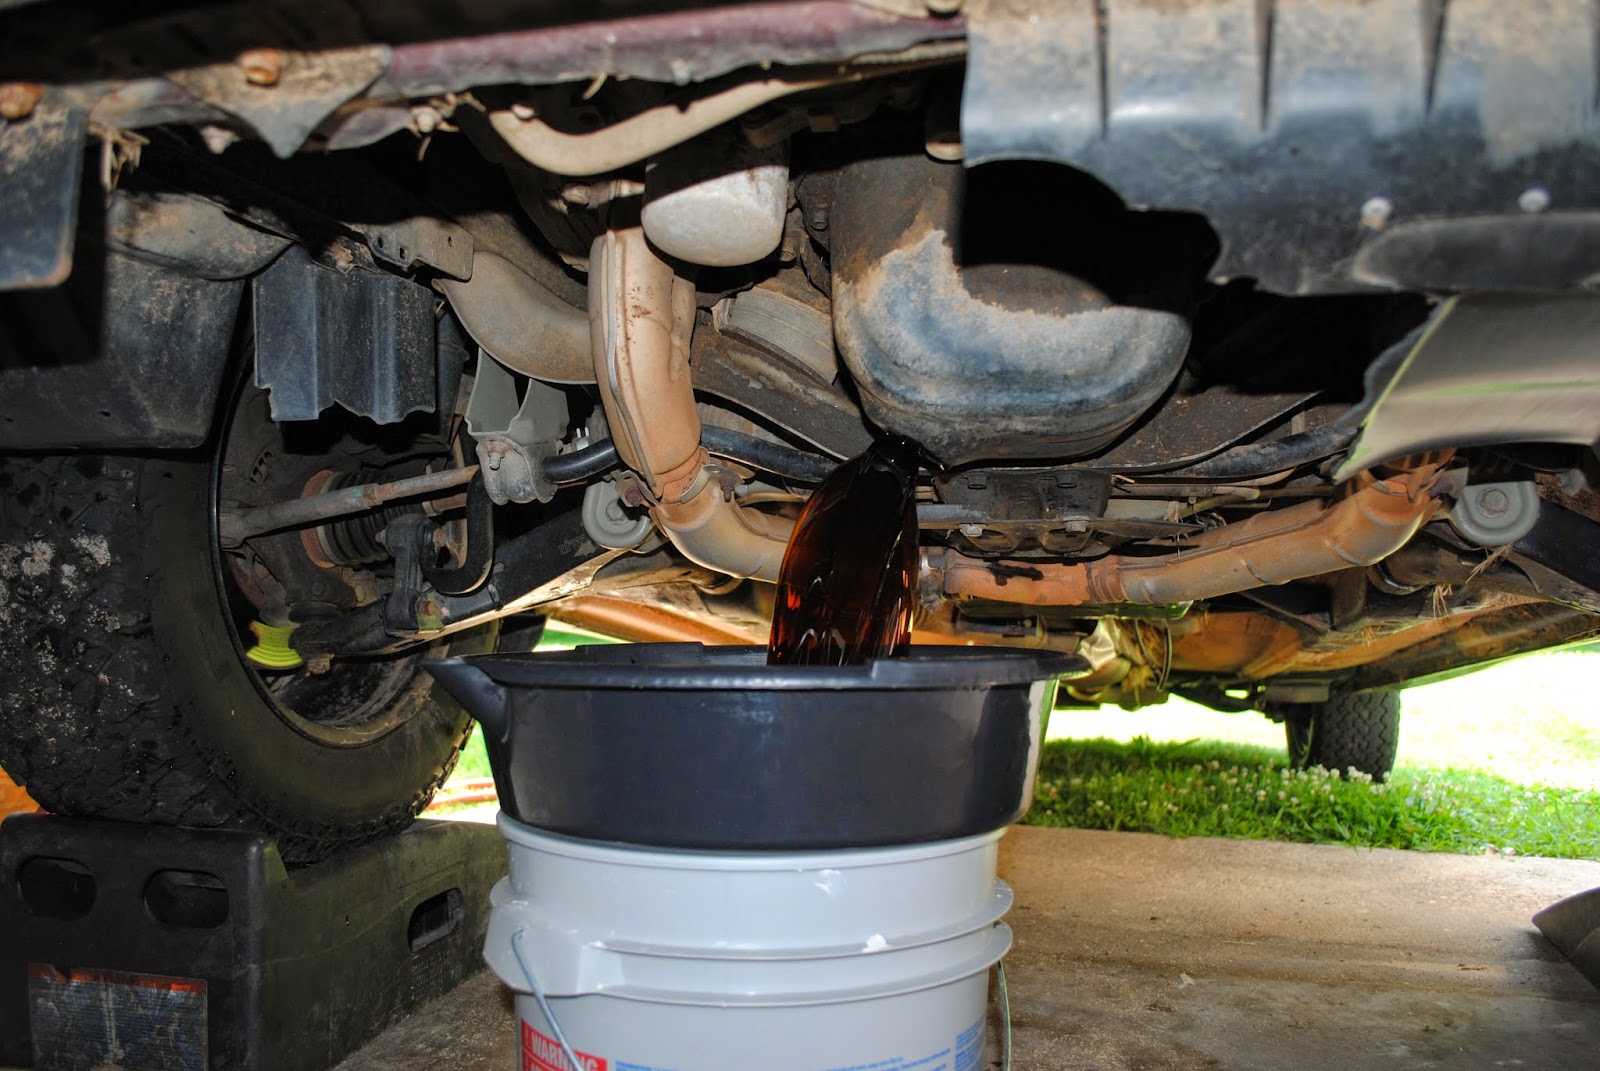

Step 7
RELEASE THE HOT OIL! Mines not flowing very well because I use a magnetic drain plug and it stuck to the oil pan. Your car probably wont have one so it will flow out much better.


Step 8
Remove oil filter by gripping with pliers, or hand, and turning counter clockwise. Careful as more oil will come from here so position pan accordingly. Set used filter to the side (I put it in the drain pan).


Step 9
Change crush washer. This basically acts as a seal between the oil pan and drain plug. Some cars have a rubber o-ring built into the plug and crush washers are not necessary. Mine does not. Some crush washers are flat and orientation doesn't matter, however on Subaru's we have rounded washers and the curve must face up.


Step 10
Re-install drain plug with new crush washer. Tighten until you feel the crush washer compress.

Step 11
Install new oil filter. It is recommended to take a small amount of the new oil and pour it into the new filter to prevent a dry start. I only recommend this if your filter is installed vertically, otherwise oil will run out during installation. Also, using your finger, rub some oil onto the black ring on the filter. 


Step 12
Pour new oil into the filler cap using the funnel provided. Then tighten cap.


Step 13
Start car and look underneath for any visible leaks. If not, put car on level ground and turn it back off. If there are leaks, you messed up and either didn't tighten the plug or filter enough.

Step 14
Drain old oil into oil container. Be sure to make a great big mess like I did (not really)....


Step 15
Ensure the car is level and has been off for about 5 minutes. This is to allow the oil to drain into the oil pan at the bottom of the engine, otherwise you'll get and inaccurate reading. To check your oil level on dipstick (pictured above) remove dipstick, wipe it off, reinsert dipstick, then remove it again and look at where the oil is on the stick. The end will either be marked with a low and full level hole (like mine) or it will be etched into the metal. Reinsert dipstick.


Step 16
CLEAN UP! Wipe up all oil and throw away the trash. Wash your hands. 


DO NOT THROW AWAY YOUR OIL AND FILTER IN THE TRASH!!! Take them back to your auto parts store and they will dispose of it for FREE!


What to do when your Check Engine Light is on?

That pesky Check Engine Light on again?


Pretty much every local auto parts store will check your computer for error codes (for free) and tell you what they are. However, they typically will not erase the codes due to liability issues. 

Here's Danny at my local O'Reillys Auto Parts store checking the computer for error codes.


Now, I didn't actually have any error codes but they come in a format like P0420. For my car that was a Catalyst System Efficiency Below Threshold. I had this code a while ago due to putting premium gas in instead of regular.

If the employees at the store aren't able to give you information on your particular error code, the Internet surely will. You can typically Google the code and find a solution somewhere in a public forum.

Friday, June 6, 2014

The Tools You'll Need

A basic set of tools is about all that anyone needs to do many repairs on their car. After doing some research I actually determined that the best tool set for college students is one that will do more than car repair. For instance this Craftsman Homeowners Tool Kit, which can be had for approximately $60, would be extremely handy for most students.


There are several reasons I would recommend this set:
  1. Craftsman has one of the industries best warranties out there. So if the tools ever break, take the receipt and tool to a Sears store and get a new one.
  2. Covers most basic sizes needed.
  3. Provides other tools that aren't so useful on cars, but very useful for college students. Such as the hammer for assembling furniture and hanging posters.
  4. A useful bag that allows for convenient storage and also, unlike most plastic tool cases, allows for extra tools to be added to the kit.
I would also recommend adding a few items:
  1. Long nose pliers
  2. Slip-joint pliers
  3. Wire cutters
  4. Combination wrenches
  5. 1/4" Ratchet, because sometimes the larger ones don't fit where you need to go.

Don't have the tool you need? RENT IT! Most auto parts stores such as Autozone, O'Reillys, NAPA, and Advance Auto Parts will loan you almost any tool for a refundable deposit.